Postingan

Menampilkan postingan dari Juli, 2012

Easter at Lush | Haul

Gambar
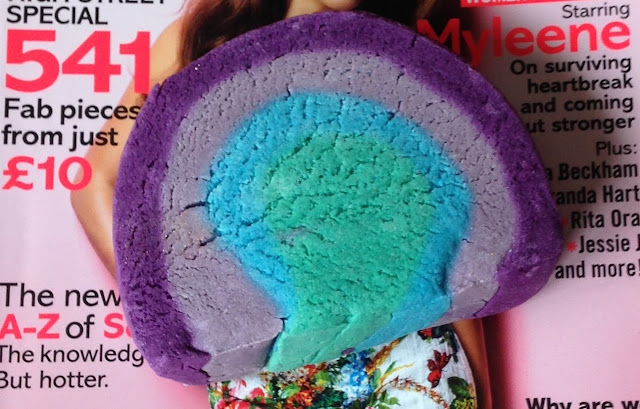
Today I am back with another Lush Haul! My last post was also a Lush Haul (which you can find  here ) and contained some products from the standard Bath products at Lush but today I have two products from the Limited Edition Easter range!  As Easter is this weekend, I thought it would be perfect to show  you   two of the products I have from the Easter selection as the products  won't be around for long!  The first product I have is the 'UltraViolet' Bubble Bar  £4.95 . It's used by taking a chunk and crumbling it under running water,  creating heaps of bubbles. It has a refreshing Violet scent, just  like Parma Violet sweets!  Lush generally say that it will give two generous baths but I personally can get around 8 decent baths from a bubble bar this size, so is great value for money.  If you prefer bubbles in your bath, this is the product for you!  The second and final product I have is the 'Fluffy Egg' Bath Bomb  £2.95 . This is a one use Bath Bomb, used by

Two Hair Styles In One - Kinky Twists

Gambar
Hey Naturals! After leaving my hair in for about a month in Kinky Twists, I thought it was time for a new look. As I began to take my hair down, I loved the pattern twists created. So I thought it would be cool to see what it would look like if I did it to all of my twists. I unraveled my twist until I reached the part that was braided at the beginning.  BEHOLD! A new cute hairstyle. I left my hair like this for another week and just put it in my bonnet to sleep at night.  Give it a try after your done wearing those Kinky Twists! -Alison

Kinky Twists

Gambar
What you need: 1) Marley Braid Hair that you can purchase from local beauty supply. I think mine were 5.99 a piece and I only used about 2 packs (I'll explain why later). 2) Pony-tail holders 3) Scissors  4) Comb What to do: Preparation It's best to start on freshly washed and conditioned hair, especially if you plan to leave your twist in for a while. Make sure your hair is combed out and then separated into "braiding sections" The back,  I separate the front into three sections (the two sides and the middle top of my head), and the middle into three sections as well (the middle and two sides) In total I had seven sections Tie all of the sections you're not working with away from where you plan to start  I started in the back section because I knew they could be hidden in case the first few didn't look so nice  Beginning: The Marley-Braid hair is already separated into individual strands. But to make my hair look as natural as possible, I cut the strand of ha

Doing Your Own Hair

Gambar
One thing I have definitely learned over the years from getting my hair done is that IT AIN'T CHEAP! Therefore, when it is time to do my hair as a broke college student, I do it myself. Sometimes as a natural you don't always want to twist or braid up your own hair just to take it down the next morning, which is why installing braids or twists with extensions is a great alternative. It is an awesome way to protect your hair while giving you some extra time to get ready in the morning. It's not easy doing your own hair but practice makes perfect. Just take your time and be patient with your hair, and start in the back so that by the time you get the hang of it, the front and the sides will be POPPIN'. In the end, you'll thank yourself for saving money in your pocket, and feel good when someone compliments you on your hair knowing you did it yourself. Good luck Naturals!

Bantu Knots on Straight Hair

Gambar
Hey Naturals, Here’s a style that brings old pressed or flat-ironed hair back to life! It also works great for relaxed hair. What you need: 1) Bobbie pins or rubber bands 2) Comb What to do: Section your straight hair into large sections, I made about eight. Take one section and make one Bantu Knot by wrapping your hair in a circular motion to make a little bun. Once you reach the ends of your hair, secure it with your bobbie pins/rubber bands. Do so to all of the sections until your entire head is done, then put on a satin bonnet and head to bed. The next morning: Unravel your knots and separate your hair with your fingers. DO NOT USE A COMB; you want to keep the pattern of the bantu knot. At night time: Make the bantu knots again to keep the curl pattern. If you want to switch it up for the next day, you can comb and wrap your hair to create a cute lil bob…:) Lemme know what you think and if it works for you. -Alison
Gambar
Gambar
Gambar
Gambar